Creating the Combat Diver Operation: Deli Platter
From character design to desk mats with iD Gaming
Operation: Deli Platter


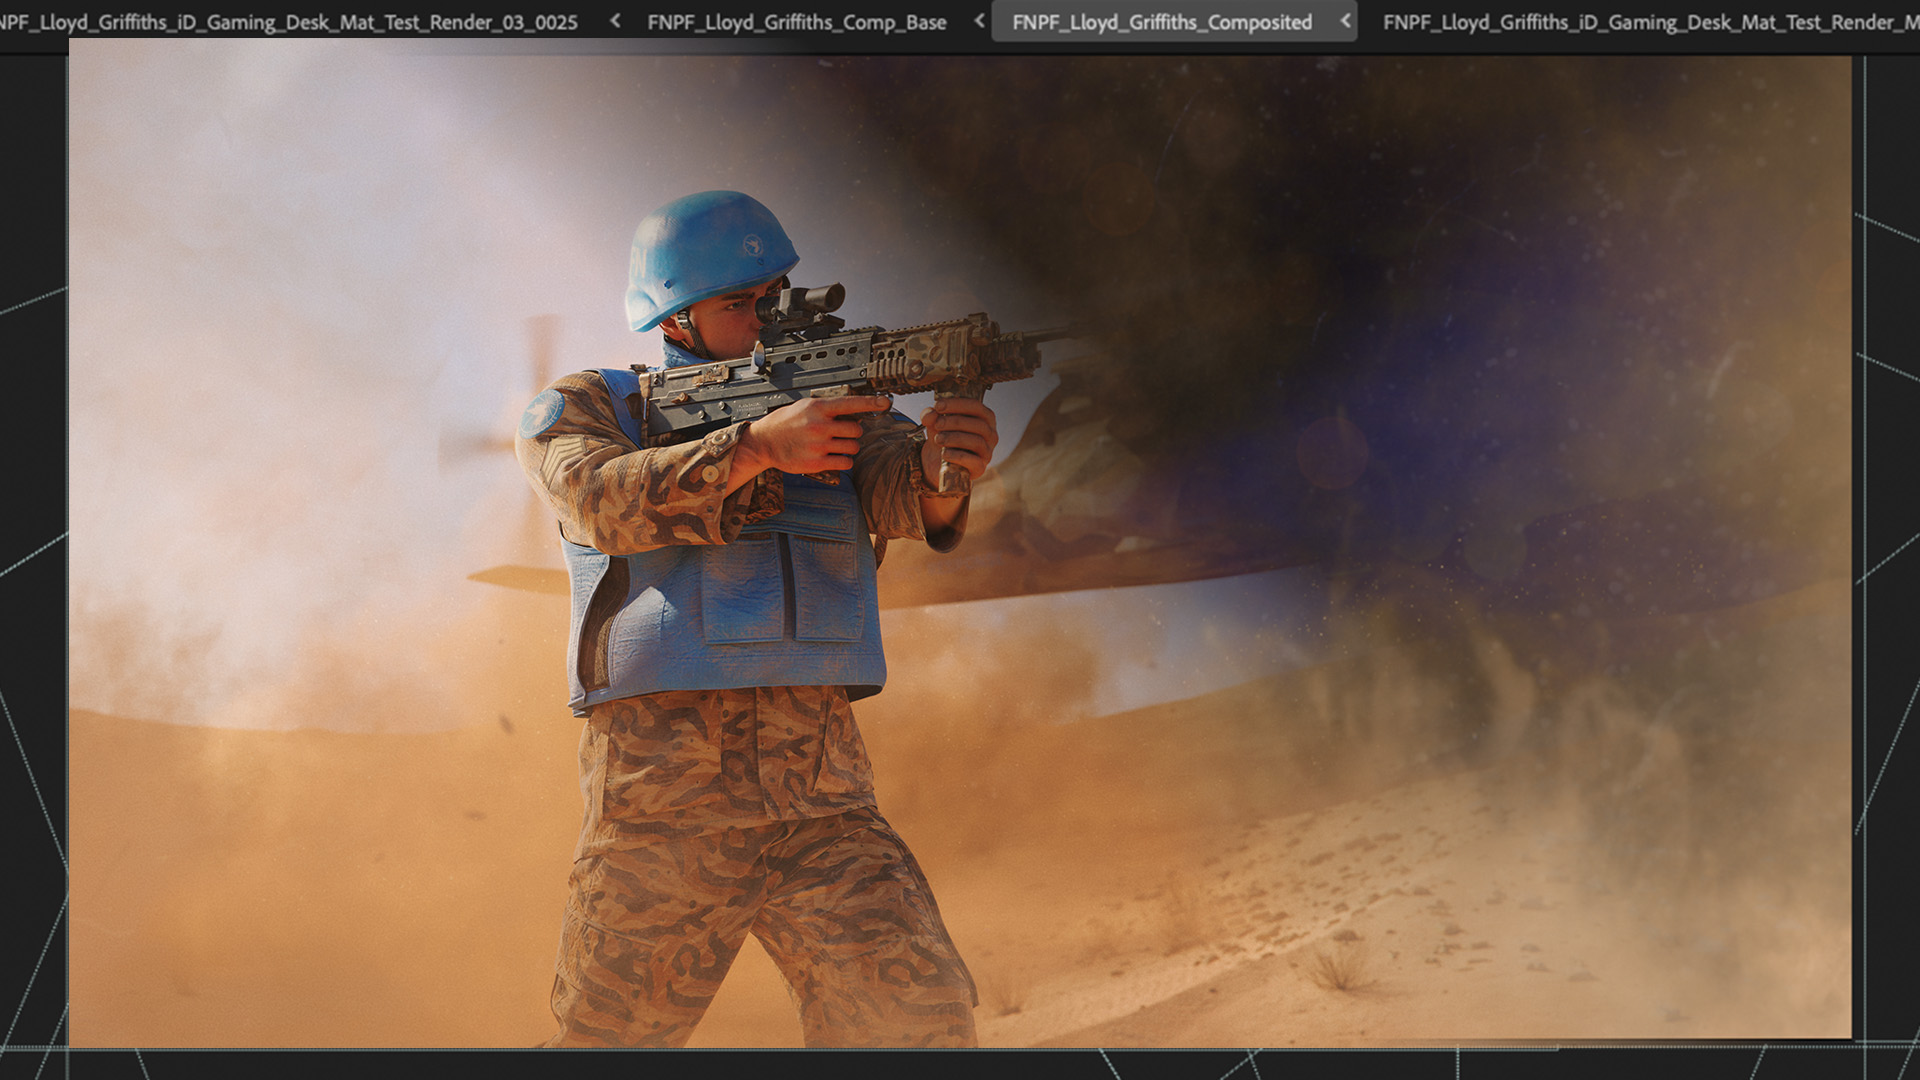
Bringing to life the Operation: Deli Platter Combat Diver - Pedro Gomez was something we’ve been dreaming of doing for a long time! And thanks to our collaboration with eSports brand iD Gaming it became a priority.
To be featured on precision grade desk-mats for eSports, we had to create a high fidelity hero render of Pedro Gomez.
In this blog I’m not going to be covering the character asset creation of Pedro Gomez. We’ve broken down that process in a previous blog: Deli Squad Designs: Pedro’s Wetsuit.
And we’re starting off the process breakdown after having created the wetsuit 3D-model. In case you’re looking for a Step by Step Process with Free Resources that covers all the basics of Costume Design. Check out this blog.

Texturing the Wetsuit
Thanks to the incredible folks at Bakermat Antwerp, we were able to get our hands on a Wetsuit PBR-material. But not just any material. An incredibly high resolution wetsuit material with all channels optimized.
Honestly, this is the key reason we were able to achieve a very realistic materiality on the combat diving suit almost straight out the box.

Every item that Combat Diver - Pedro Gomez carries was textured with every attention to detail. Layering bit by bit the wear and tear, roughness variation and finally wetness.
No matter how realistic your materials look, it’s an essential step to add usage marks to your model.
It will especially yield good results if you think of the wear and tear you’re adding from the perspective of how the object would interact with real life.
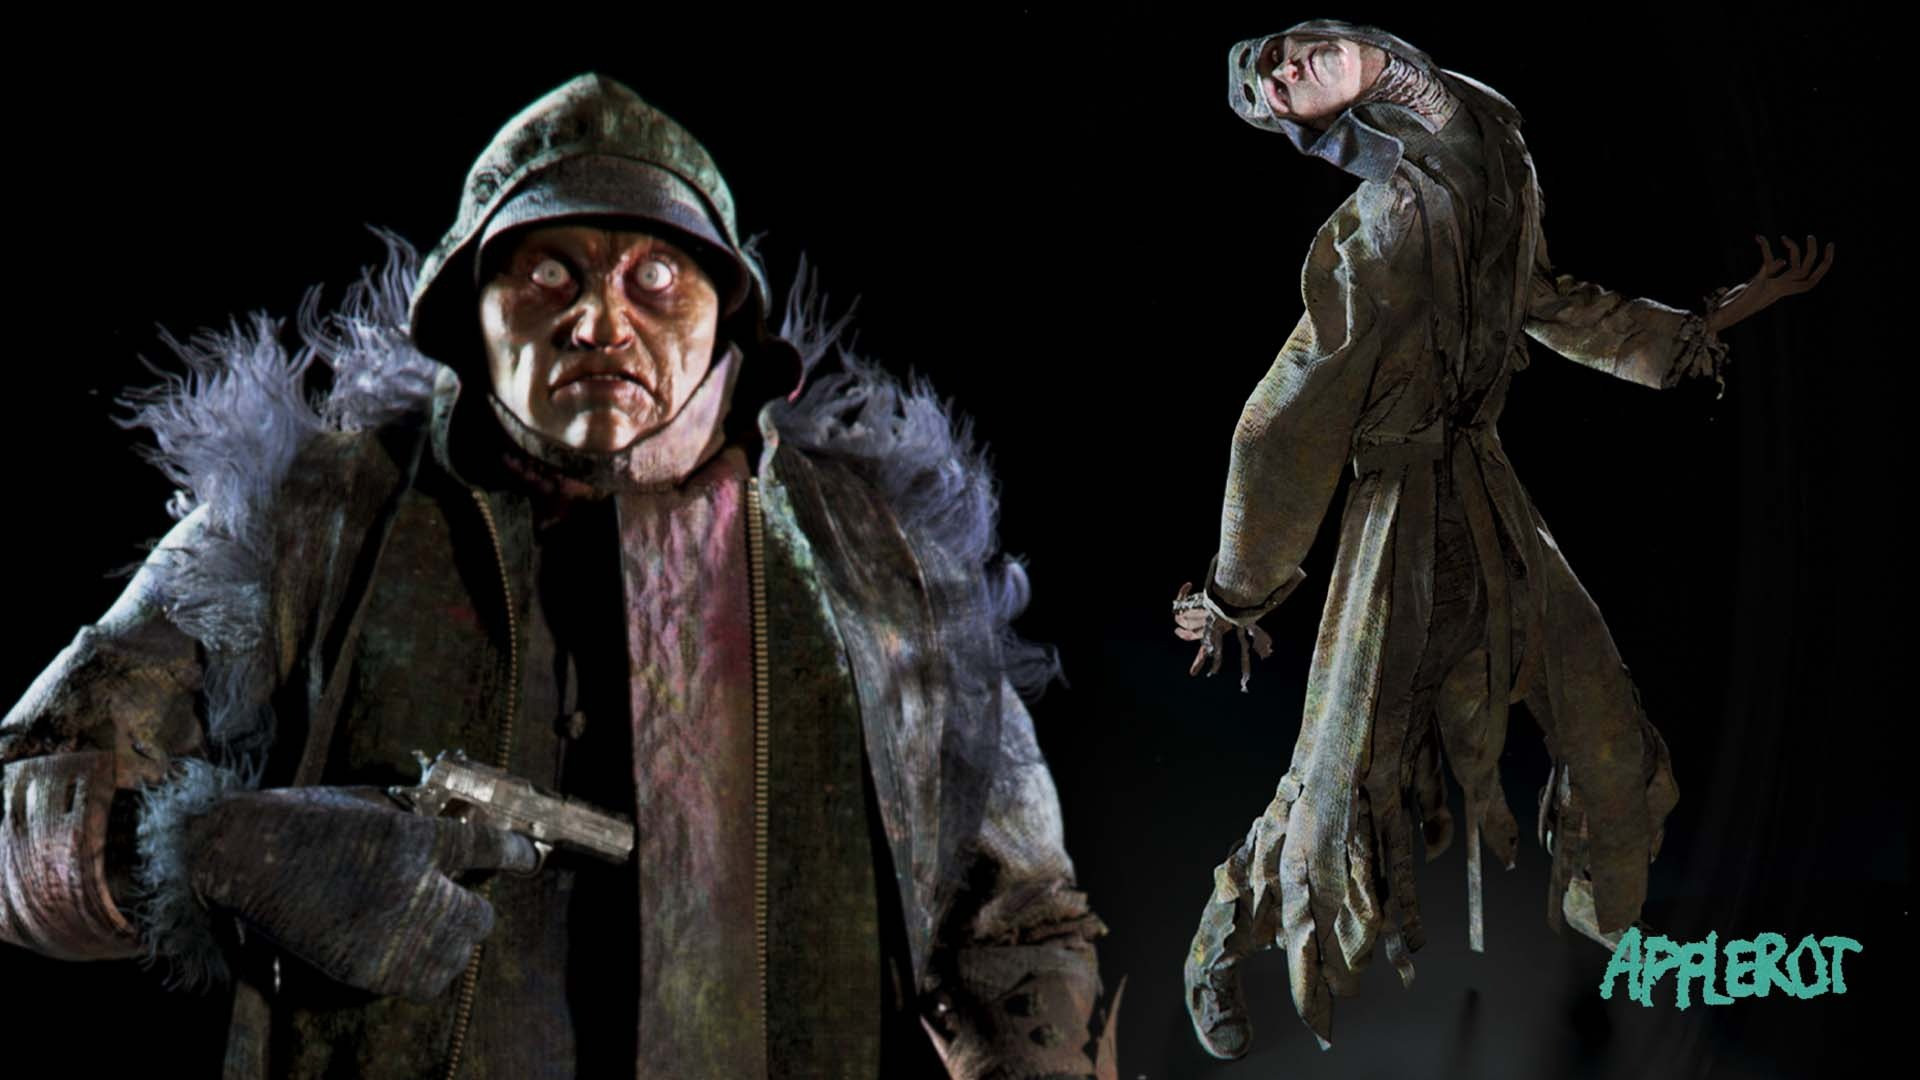
In the case of Pedro Gomez, he is a special operative from the Deli Squad. A Tier Zero covert unit assigned to Operation: Deli Platter.
What does that mean for his wetsuit?
It means that it’s pretty much new. And has only been used a few times in training.
This means that the level of wear and tear we’re looking for is mainly related to manufacturing processes, storage and both salt, sun and scratch damage.


There is also an aspect of World-building that is important to adding realism and narrative to your objects. In this case the wetsuit is provided by in-world company Greyhound Industries.
For this we’ve created a simple decal sheet that is accompanied by the Greyhound Industries fictional branding. These motifs were scattered throughout the wetsuit design, that gives every area its own additional cohesiveness.
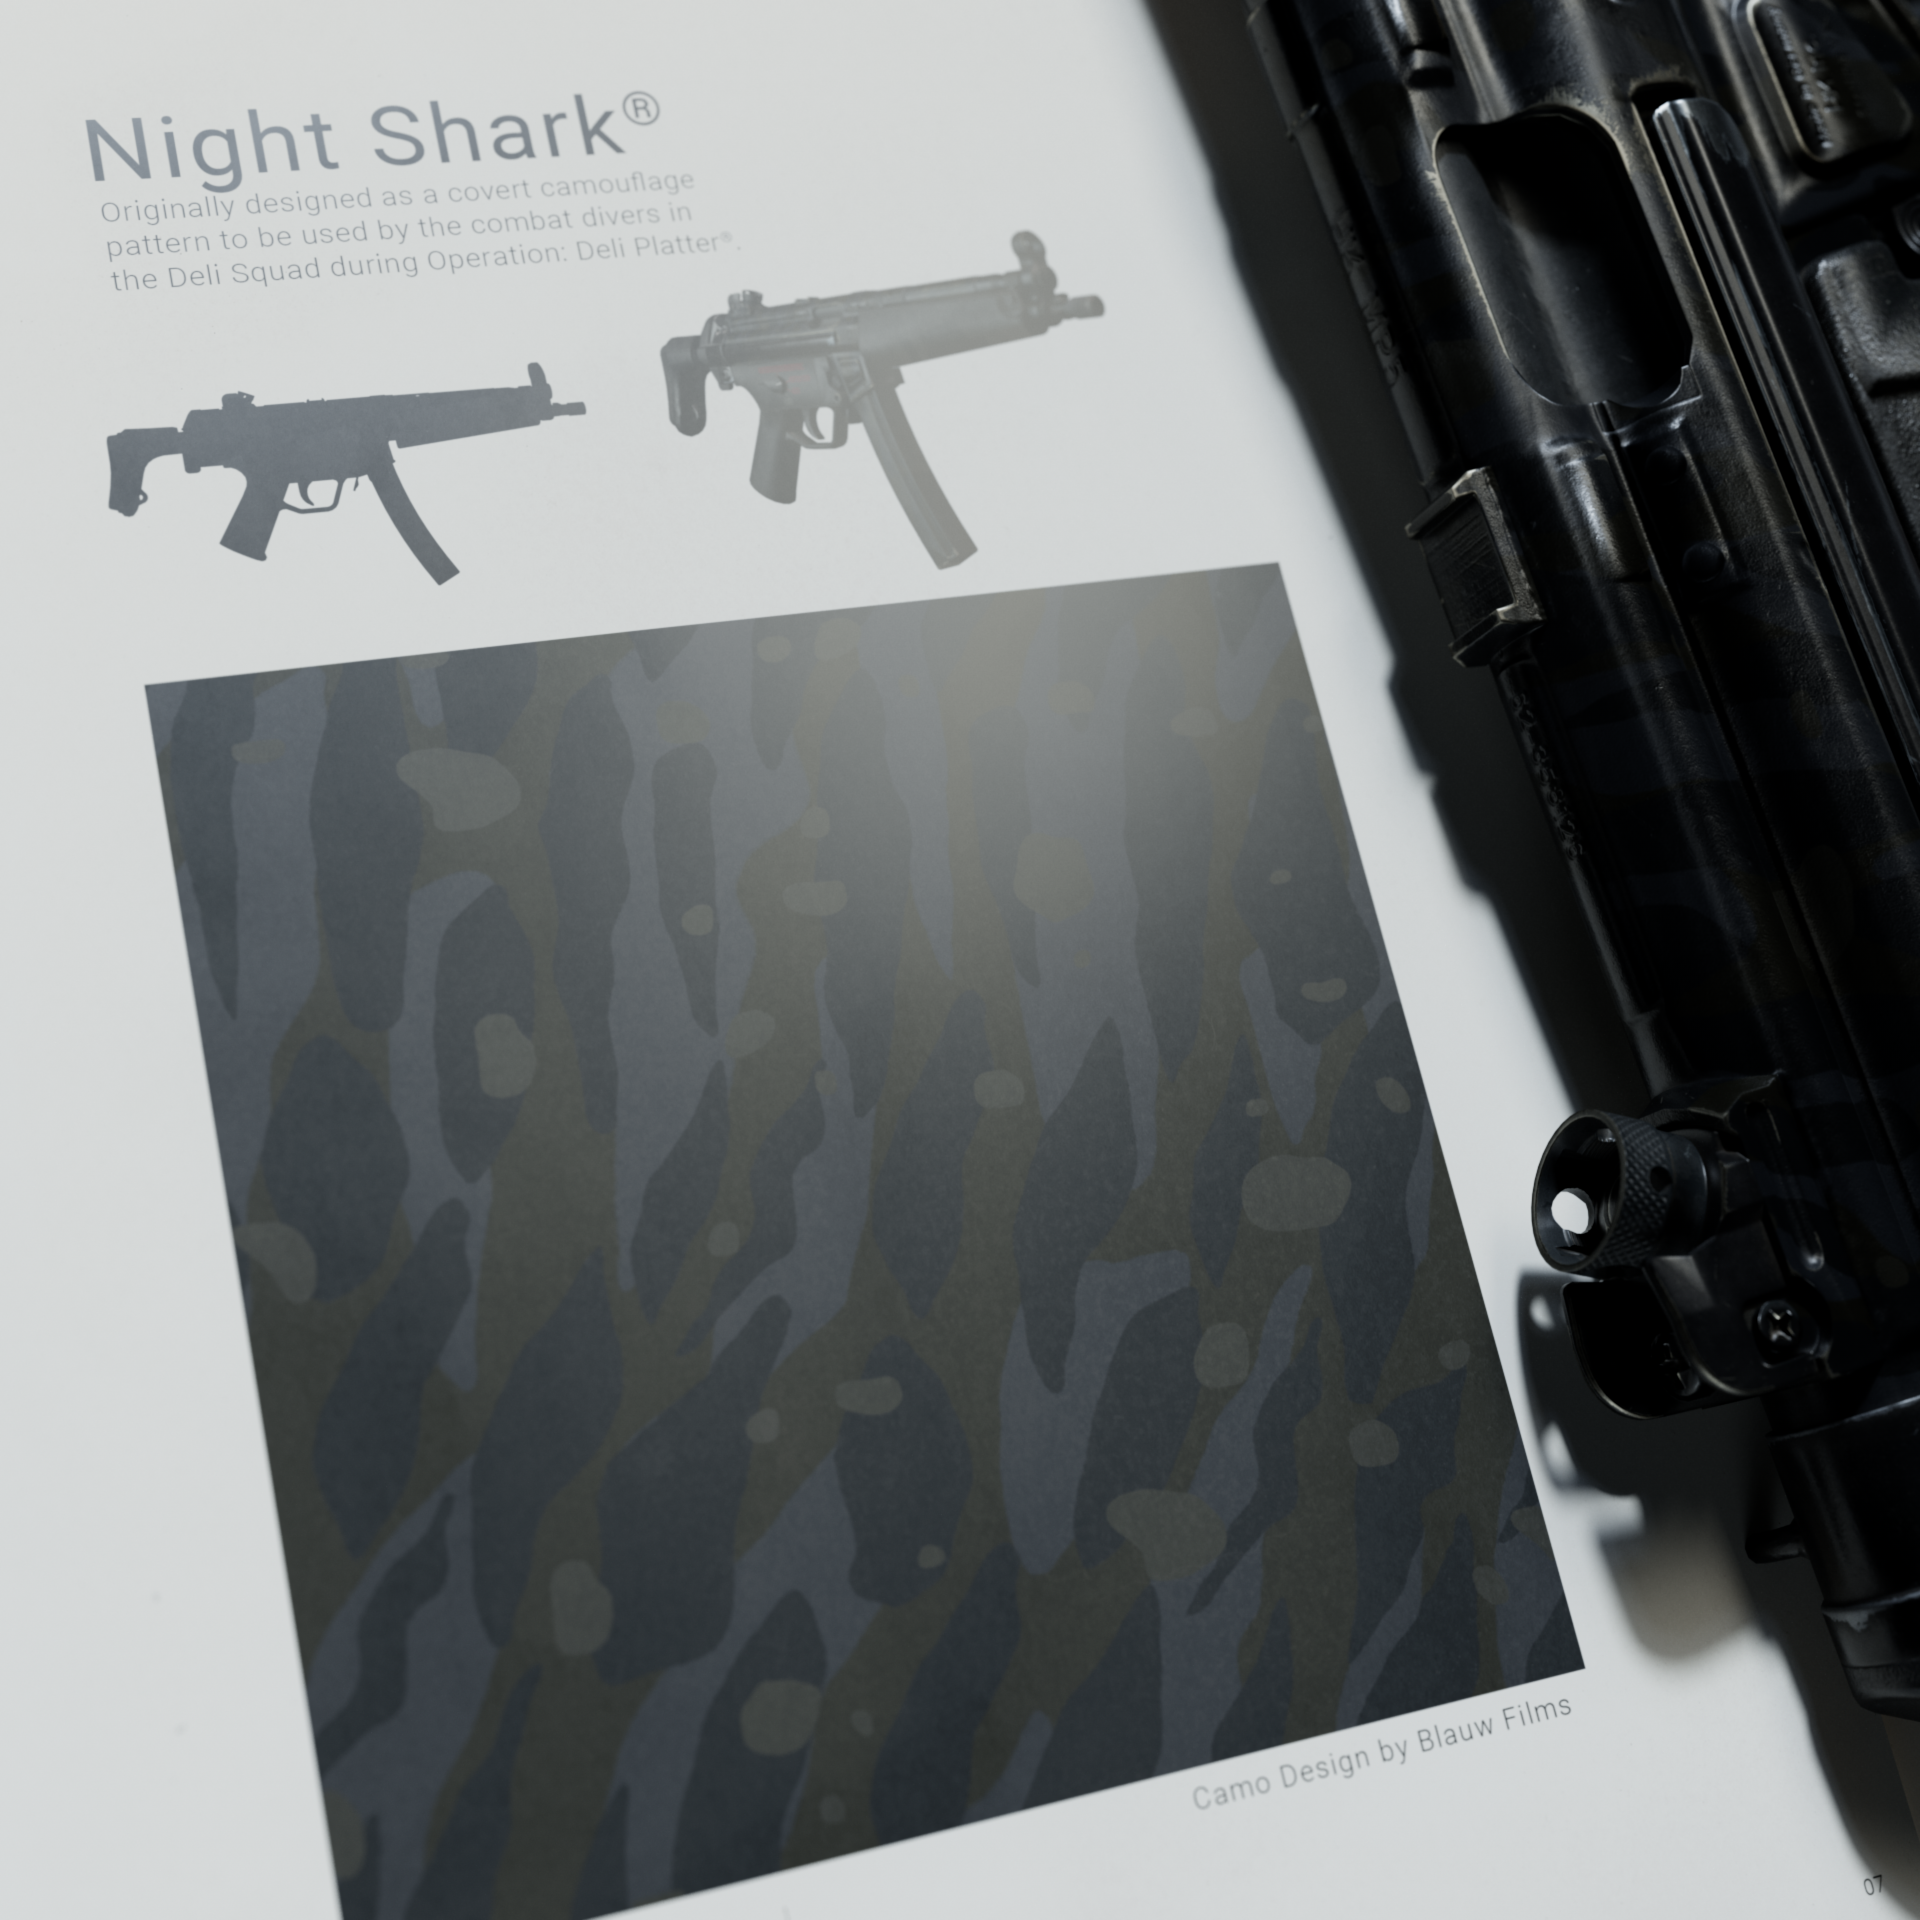
And for the Deli Squad’s covert operations they have created an assortment of custom camouflage patterns. In this case, the wetsuit is covered in the Night Shark camo.
Every detail counts.
Look Development of the Wetsuit
As we are not covering the sculpting process or character design process from Pedro Gomez in this blog, I’d like to continue to the Look Dev stage.
We did however add a simple texturing pass to the Pedro Gomez character with wetness. Every time you can add the elements of nature into your scene, you should add it to every asset.
Contextually, the entire scene will come together much better if all the assets are blended.
To ensure your textures work well on your model, it’s important to spend some time setting up your shaders.

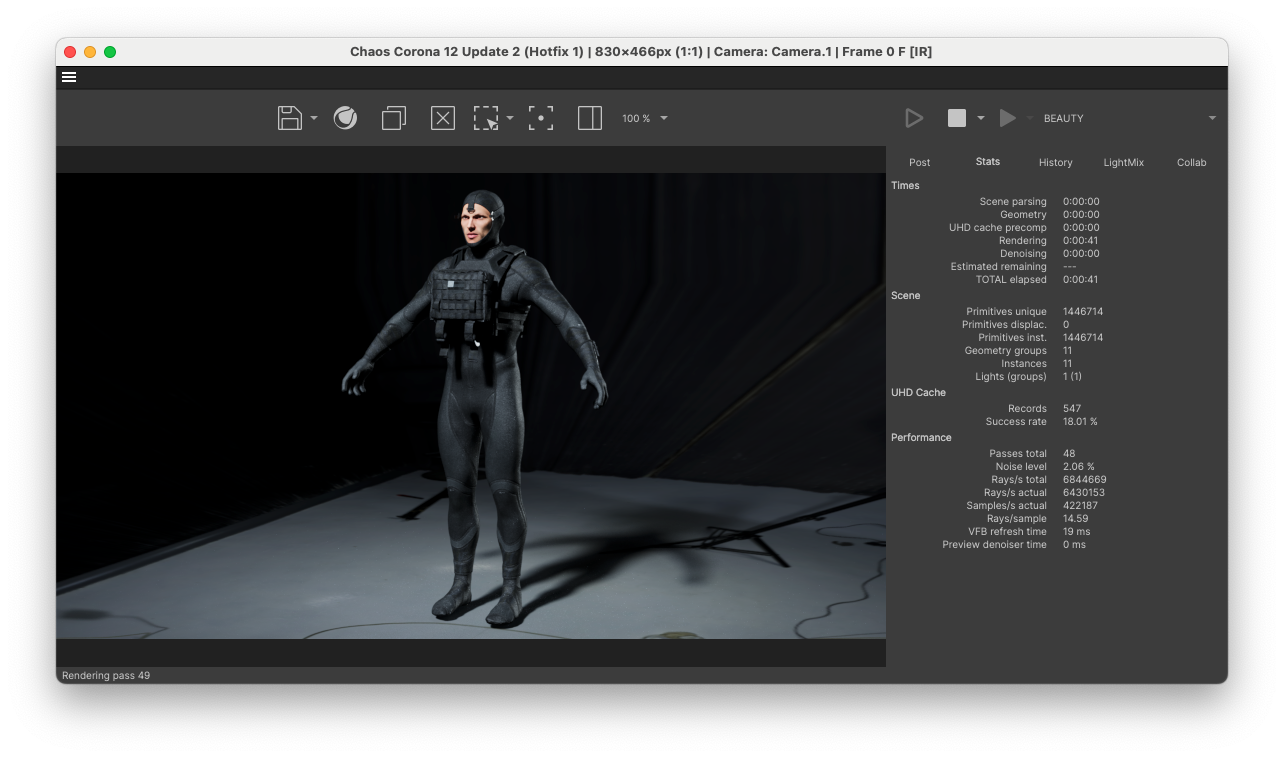
I’m using Cinema 4D and Chaos Corona for Operation: Deli Platter.
First, I’ve imported the character asset and wetsuit inside of a new scene. I’ve created a floor-plane to which I’ve applied a Shadow Catcher material. Then I’ve added a Corona Sky set to Dome Projection. Here I can apply the HDRI of a Studio setting.
After playing with the Origin of the Corona Sky and correctly setting the Camera Height, we should have an “accurate” looking Look-Dev setup.


For the wetsuit material we exported a Metalness Map next to the Diffuse, Roughness, Normal and Displacement. We can use the Metalness Map to give an additional layer of highlights that is so often seen on wetsuits.
Together with all of this I’m using the Diffuse and Roughness channel at a +0.15 exposure inside the Sheen Layer. This adds an additional layer of softness that wraps around the fabric, making it truly feel like a wetsuit.

This was the time to replace the character and wetsuit asset with the posed one for the scene. The suit was created and simulated in Style3D. Now was also the time to add the additional equipment and items. From the BDU vest, to the diving goggles, Ruger Mk IV pistol and Recon Tanto knife.


Personally I believe the Look Dev process is one of the most important aspects of achieving realism in 3D. This is where you should be spending a good chunk of time to ensure each asset is behaving properly under different lighting conditions.
The assets you’ve dedicated your time and creativity to don’t always come to justice right after texturing. The Look Dev process ensures consistency between every asset in your scene.
Once me and Charlotte Simons were happy with the Look Dev it was time to build the scene and place the character in it.
Scene Building and Lighting
From the earliest sketches we knew that we wanted a night time scene, lit by moonlight, by the ocean. There are quite a few ways to achieve this result, but the most important consideration to make was Render Time.
For this reason I decided to get as much of the result out of a well-designed HDRI Map that could be projected as a Dome using the Corona Sky.
I’ve downloaded a variety of HDRI Maps from Polyhaven and then started merging and cleaning them up inside of Photoshop. Especially removing the starlight from the areas supposedly covered by clouds.


Now we have a realistic environment map that will naturally reflect light on all surfaces.
To show you how good results are always a process of iteration, this is what it looked like upon simply importing the character asset:

Lots of work to do still.
First of all, the ocean surface. To achieve this I wanted to blend a “Plane” with the natural horizon line of the HDRI Map. My preferred approach was to create a circular plane with a Water Shader and an Opacity channel.
The Water Shader consists of an IOR value of 1.33 and a Vector Displacement Map of the Ocean surface.
This will make sure that the surface will catch the highlights and mimic the natural color of the environment.

To avoid tiling I’ve placed the Vector Displacement Map inside of a Mapping Randomizer with the following settings.


Finally, Opacity. To ensure a natural falloff I’ve used a 3D Spherical Gradient inside of the Opacity channel. Continuously looking at the Interactive Renderer from above to make sure that I was getting the transition I was looking for.

Great. Now we’re getting somewhere.
After adding a variety of additional assets into the scene, from rocks to a sandy foreground and the Deli Squad military boat, the scene was ready to render.
Oh! And using Chaos Scatter I’ve scattered a whole lot of water droplets onto the character and its items.

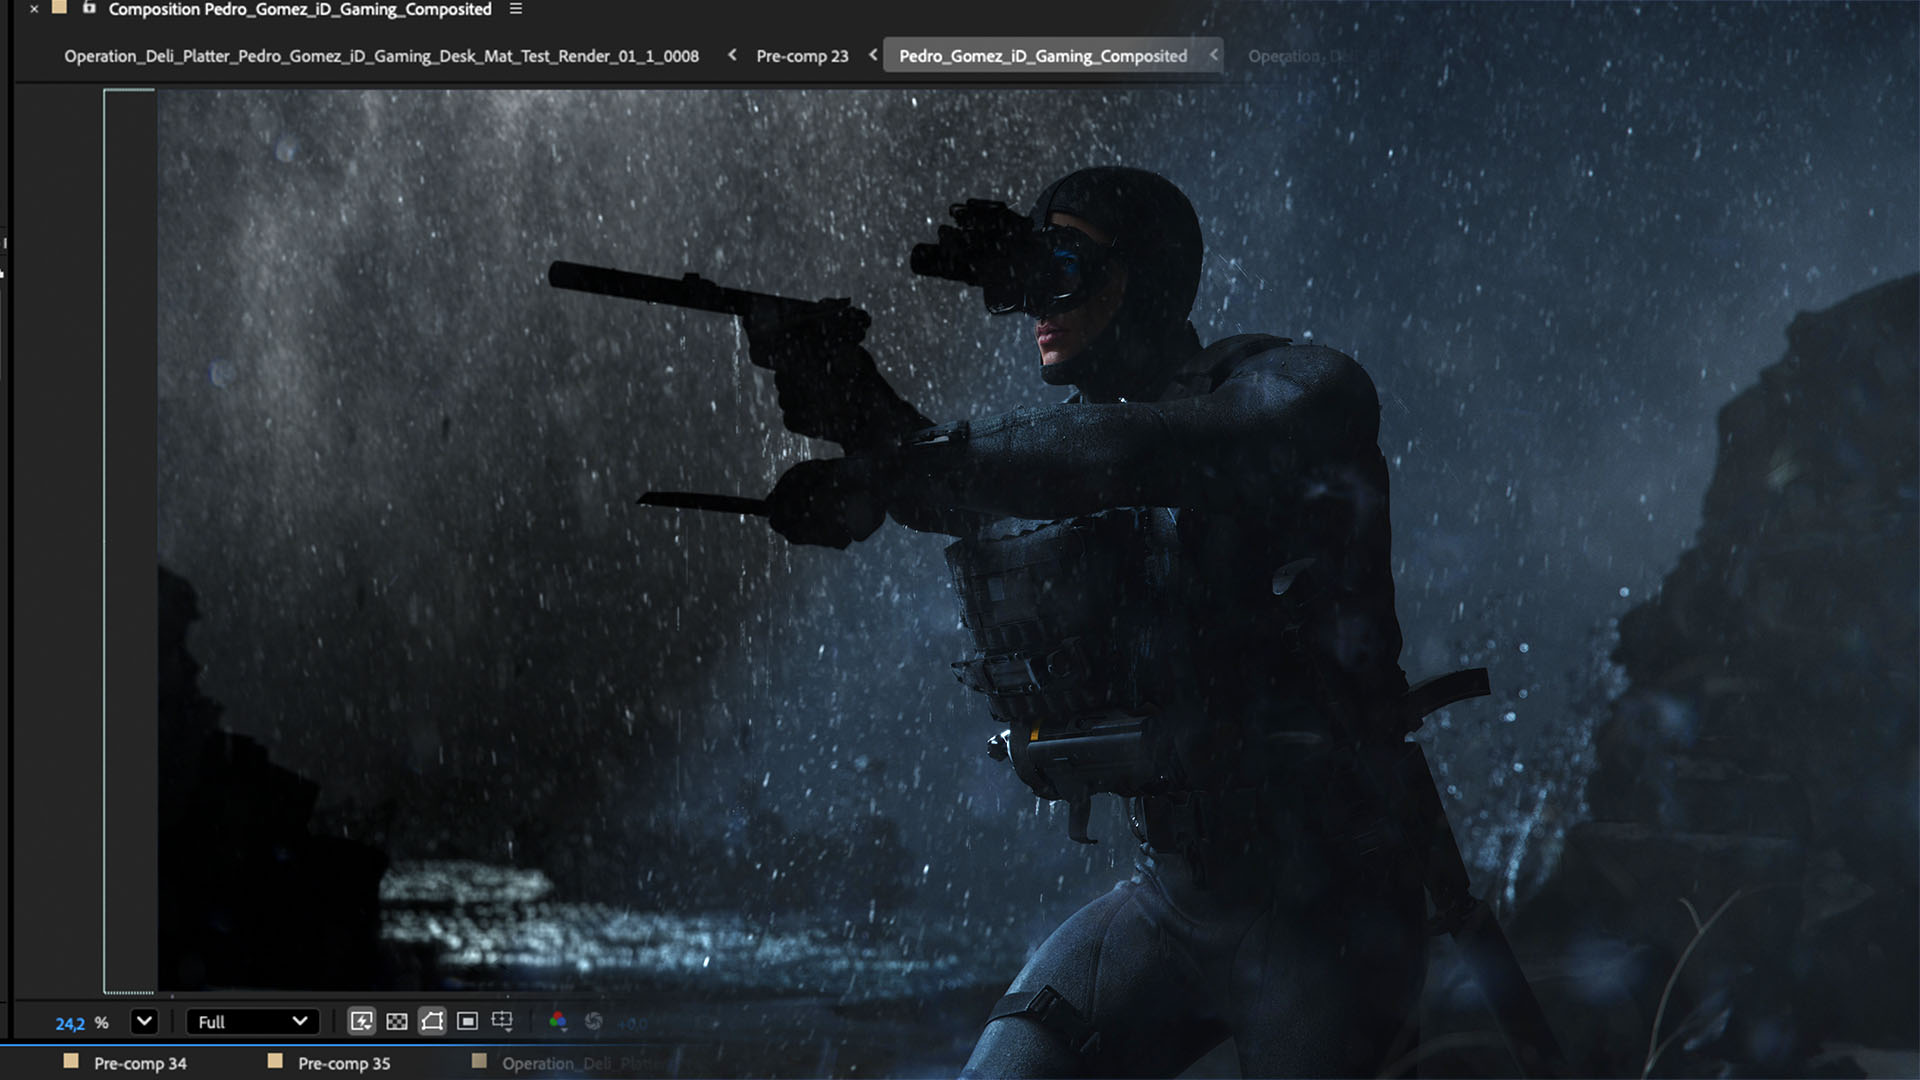
Compositing the Scene
Maybe my favourite part of completing an artwork. After rendering the Combat Diver scene in 32-Bit with Multi Passes it was time to bring it all together inside of Compositing.
I’m using Adobe After Effects, as that’s the software I have most experience with. But the results can be achieved in both Nuke and Fusion as well.
Using the different passes like zDepth, NormalsShading, Reflect, Refract and Volumetrics I could mask out every asset I wanted to composite. Especially water drips from ActionVFX, Rain and Fog from FX Elements and even early Lens Water Drop from Action Essentials 2 by VideoCopilot.
The compositing process was both meditative and straightforward.
Placing an asset, matching Color, matching Focus, matching Grain (if needed), masking for accurate placement in 3D-Space, repeat.
In the end these are all the compositing layers that have been added to the scene to create the final artwork.

Conclusion
It’s an incredible opportunity to be working with iD Gaming and bringing the world of Operation: Deli Platter to physical products this early on!

Check out the Combat Diver artwork on the Art Gallery for its full glory!
For the uninitiated: Operation: Deli Platter is a world in early development at Blauw Films. A 3D-animated series lies far into the future, but the IP expands beyond that.
Games, collectibles, conspiracies, and beyond…
But today we’re starting with eSports desk mats.


Reading List
References
- iD Gaming x Operation: Deli Platter — Website
- Bakermat Antwerp Virtual Library — Website
- Maxon Cinema 4D — Website
- Chaos Corona — Website
- Style3D — Website
- Polyhaven HDRIs — Website
- Adobe Photoshop — Website
- Adobe After Effects — Website
- Foundry Nuke — Website
- DaVinci Resolve Fusion — Website
- ActionVFX — Website
- FXElements — Website
- VideoCopilot — Website


%20by%20Ivan%20Aivazovsky.jpg)


0 Comments