Making the GURA® AORU Cinematic
Realistic 3D Mech Animation
GURA
.png)


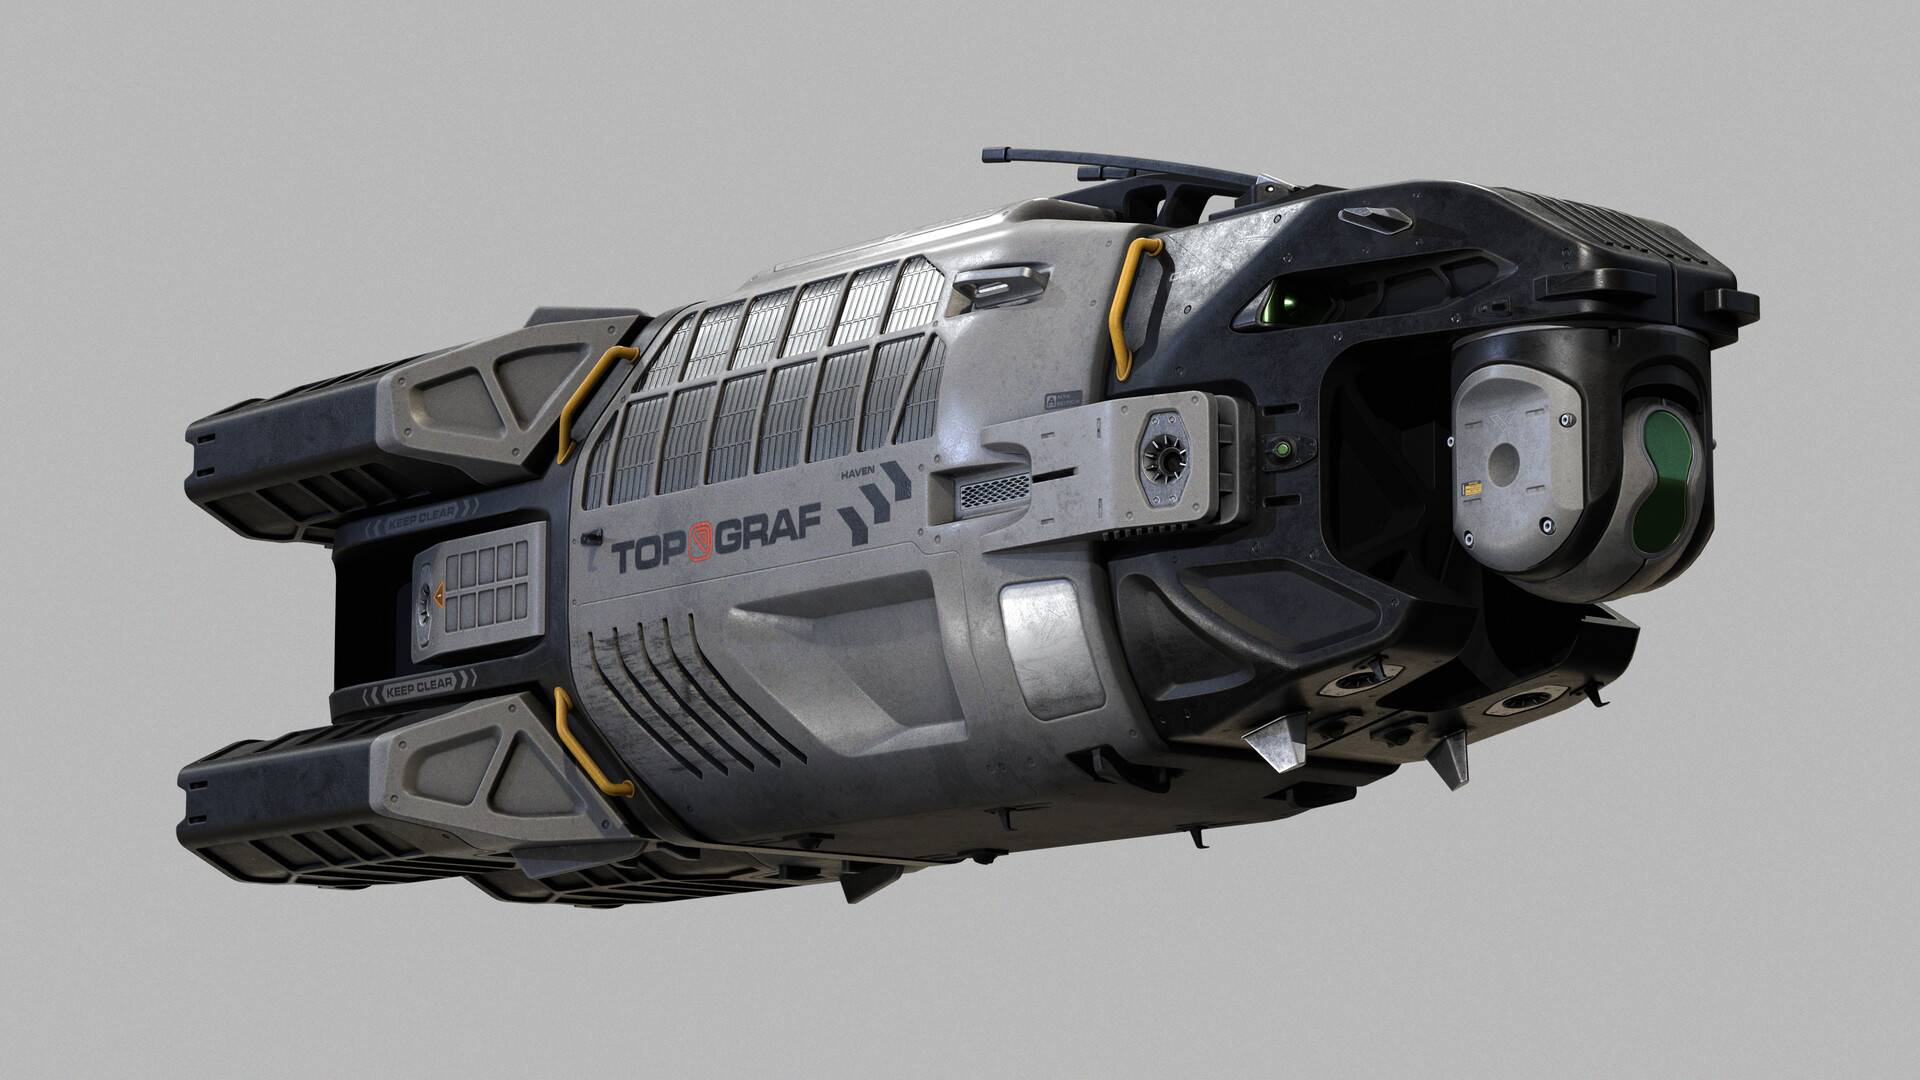
Last year I had the honor to work with Edon Guraziu on a short cinematic for his upcoming GURA video game. As a first promotional video we wanted to visualize the GURA® Autonomous Orbital Reconnaissance Unit [AORU].
3D Rendering Dynamic Scenes
Throughout an iterative process of filmmaking, design and pure fun we focused on creating a realistic cg rendered cinematic. And to truly explore the power and speed coming from the AORU we started looking at all the subtle elements of dynamic realism.
.png)
.png)
.png)
Creating an effective cinematic is all about understanding the art of filmmaking. What shots are shown in a sequence to give you the right feeling for the piece.
The GURA® AORU is already a very strong design. And working with high-fidelity assets tremendously improves your ability to achieve great results. In the cinematic we always knew that the AORU was going to be the focal point.
This allowed us to dedicate the efforts where they would most count.
- Storyboarding
- Texturing and shading
- Composition and lighting
- Animation
Storyboarding Process
Edon already had a clear vision of what elements were required to tell an effective story with a limited number of setups. The first version of storyboard I was provided was sketched by him and shows what important elements should be highlighted.
- The AORU makes large swooping motions
- It travels far distances (both in space as over the landscape)
- There is a clear sense of speed
- The thrusters, turret and stabilizer fins are key points of interest

I personally tend to do most of my creative concepts in a notebook. And this cinematic was no different.
On the Left page I was deciding on what elements make up a good sense of depth. Layers of clouds and rock formations, that each cast shadows into the environment, brings a sense of narrative depth that lives outside the screen. A shadow falling onto the AORU from outside the frame insinuates there being a larger environment around what we get to see.
On the Right page I was re-drawing/re-interpreting Edon's storyboard to better understand the mechanics behind these shots. Are we on a wide-angle lens? Or are we on a long lens but further away?
I'm using this process to better decide on the "energy" of each shot. As well as anticipating how my technical process will be once I sit behind the computer.

Texturing and Shading
This next step can truly make or break your 3D-renders, so it's important to spend as much time as you have available on this. You want each material that is applied to your object to behave properly under the different lighting conditions you will put it in.
Luckily for me the asset that Edon provided me was already textured so we could immediately get into building shaders.
Below are the renders that Edon made himself that served as a direct reference for the shading.


The shading process wasn't incredibly complicated thanks to the quality of the texture maps provided. What was especially useful was having the different Metalness values split up into Red, Green and Blue channels. This allowed me an extra layer of fine control of each material's properties without requiring multiple texture sets.


At this point it was mostly a matter of tweaking the values in each of the nodes until the AORU looked correct. I was mainly looking for matching the Roughness values and colors.

Finally I wanted to give some extra life to the Turret as it was going to be one of our focal points.
To do this I resorted to a natural phenomenon called Thin Film Interference. It's when light passes through a layer that has a sub-nanometer thickness and then produces interference of different wavelengths.
Under certain lighting conditions the incident light will reflect back with an iridescent color effect.
The turret could have thin film interference due to a coating for example. Which is in fact, the most straightforward way of replicating this in CG.

The Layered Material above is blending the Refractive glass material of the camera lens (M_camera) with a Physical material using a Thin Film Shader as its color. To achieve realistic values of reflection and refraction I made use of our own IOR 3D Database that has searchable values of many materials.
{{iordatabase-promo="/styleguide"}}
I've set the Thickness to 300nm at an IOR of 1.57, followed by 10 Spectral Samples to get the following effect:

Composition and lighting
The next step was testing out how the AORU would look in different lighting scenarios.
From the start we knew that this cinematic was inspired by the look of films such as Prometheus (2012). The work of Dariusz Wolski (Director of Photography) became a huge source of learning material.
How does one maintain cinematic detail the shadows while minimally lighting the subject for a naturalistic effect?

A lot of it came down to using a bright sky-dome that would both act as our color and fill light. The floor material was also specifically tweaked to provide a strong enough bounce to add even more detail back into the shot.
But we went through a few other iterations as well. In the beginning we used an earth-tone HDRI as a placeholder to get a better feel for how the AORU would react to the environment.


But it became clear to us that this wasn't the look we were going for. We were looking for something more dramatic.
This led to creating a darker environment for the AORU to fly through. That would fundamentally darken the bottom of the asset, giving it a stronger sense of depth.
I played around with the sky-dome until we had something with a deep blue color that didn't add too much brightness.
And finally I could focus on the directionality of light through the use of a sun. In this case I'm rendering everything in Chaos Corona so I'm using a Corona Sky + Corona Sun.
An important aspect of the cinematic style we were going for is volumetric fog. This adds an additional layer of softening of the image (even though it does increase average render-times).
I used the atmospheric density effect inside the Corona Sky. With a bit of tweaking you can get very believable results that naturally interact with the objects in your scene.


Animation
Animating the AORU was quite a simple task as Edon provided me an asset that was fully rigged. For each of the shots I created a new project file in which I only animated the section of motion that was needed.
At first I tried animating the entire sequence in one go. My thinking was that this would speed up the workflow as I could then place multiple cameras and capture the entire sequence. The problem became apparent to me quite quickly when the file became too slow to work with due to the amount of assets.
So, each shot from the previously shown storyboard became its own project file.
I broke down the animation into 3 levels
- General Motion (Spline based)
- Hero Motion (Animated keyframes)
- Detail Motion (Vibrate tags)
Below you can see the animation stacking in action.
• The [Glider] object has an Align to Spline Tag to it which makes it follow the Spline Path as a rollercoaster.
• The [Reactor_A_ low.1] that I have currently selected has a Vibrate Tag applied to it.
That uses a tiny bit of vertical amplitude on an animated Frequency to give the sense of force and moving through the wind.

At the end of the day, every element needs a bit of love to truly convey the result you're after. And if you look at the final animation sheet for 1 shot, you can get a good feel for what detail is required for convincing animation:

And of course with Motion-blur, depth of field and post-effects such as Bloom & Glare we got a result we were all quite happy with.
Conclusion
Creating a dynamic 3D mech animation is really about balancing all aspects from composition, texturing and shading and animation. For anyone working on an animated sequence, I'd recommend you first storyboard the sequence to get a good sense of flow. I hope this breakdown has been useful to your creative process :)


Reading List
References


%20by%20Ivan%20Aivazovsky.jpg)


0 Comments